As I was listening to NPR this morning, they reminded me of something great and wonderful. As of tomorrow, ALL U.S. Citizens will require passports for travel outside the United States. Yes, boys and girls, that also means for Canada and Mexico.
Isn't it great?!
I have long thought that having a passport should be a requirement as soon as you can recognize your own name. Oh sure, I doubt that these regulation will cause Americans to lose their "see America first" mentality, and in many case will cause many more to never travel outside of the U.S., but I still think it's a great feat that our government is finally getting on the band wagon with the rest of the world. You see, as Americans, we're lucky that we've not had to use passports for everything all this time. I remember going to Canada when I was 19, and not needing more than my driver's license. It was only a few years ago that they required a birth certificate to cross the border back and forth. And don't get me started about crossing the Mexican border. Even though I've never done it myself, I've heard stories about what happens to people who were US citizens trying to cross without the (not necessary) passport as they were swindled by US Border Guards, or handed over to the Mexican police.
Now, for air travel all US citizens must present a valid passport. And this includes children. Unfortunately, we can still quench our need to be holed up on disease carrying ships or crossing the border in a car/bus without passports. Those over 19 only need to show a photo ID, and those under 18 only need to show a birth certificate. Okay, so we're making some measures to catch up to the Soviet Union of 1950, but perhaps we're not there yet.
And speaking of the Soviet Union, when I was in Russia a few years ago, I was amazed at how much people used their passports in every day life. Having traveled previously in Western Europe, I suppose I took my passport for granted. There, everyone carried their passport or an identification booklet for young men who get stopped often to see if they're dodging the draft [to fight in Chechnya]. In my personal case, I'm talking about when I had to surrender my passport to have my visa validated, when I feared that my identity was gone. That's one thing about us, isn't it? Once we have a passport, we don't walk away without it easily. I was terrified handing some strange "official"100 rubles (re: bribe) and walking out of the room with naught but a copy of my passport...for 3 weeks! When I finally got it back, I was relieved beyond belief. So when I walked across the border from Boliva to Peru a few years later, and the guard walked away with my passport, it wasn't such a HUGE shock (but that doesn't mean I didn't follow him around the check point like a beggar making sure that nothing happened to it).
I am glad to see that US citizens are now required to have passports to go abroad now. Even though they're still not necessary to travel through the U.S. Territories or to Puerto Rico, at least we don't have to have our passports for domestic travel yet. It could happen.
31 January 2008
25 January 2008
And It's Back to Serbia!
Just a heads up to everyone that I'm off to Serbia again next week so look for continuing adventures of 'Greetings from Serbia.'

It'll be full of me trying to have a meatless Lent in a country which diet is meat filled with meat wrapped in meat (seriously), lots of Absinthe cocktails, and me waiting (and meanly hoping) that Kosovo will unilaterally declare independence and sovereignty thus plunging Serbia into turmoil and maybe I could catch another protest in front of the American Embassy.


It'll be full of me trying to have a meatless Lent in a country which diet is meat filled with meat wrapped in meat (seriously), lots of Absinthe cocktails, and me waiting (and meanly hoping) that Kosovo will unilaterally declare independence and sovereignty thus plunging Serbia into turmoil and maybe I could catch another protest in front of the American Embassy.

23 January 2008
M. Butterfly-my completely unbiased review…
Over the weekend Lauren and I visited some of our good friends in Philly. I’d never before been to Philly and was looking forward to some sight-seeing and had decided that I would even good naturedly look at the Rocky steps and admire the Liberty Bell. However, when we arrived on A&J’s doorstep the combination of their less than enthusiastic greeting of “I suppose you want to sight-see tomorrow” and the knowledge that tomorrow was going to be freaking cold helped us to decide to postpone touristy activities for a warmer month. We would still get to do what we really went to Philly to do-to see David Henry Hwang’s M. Butterfly.

Through some savvy internet stalking I discovered that an actor I particularly like, Christopher Innvar was going to be in the Philadelphia Theatre Company’s 20th anniversary production of M. Butterfly. The synopsis per their website goes thusly:
“Based on a true story, M. Butterfly is a provocative and captivating story of lust, politics, and betrayal. A French diplomat falls in love with a Chinese opera singer who is to him, the "perfect woman," yet this Chinese butterfly of his passions is ultimately revealed to be far more than she seems. Inspired by Puccini's opera Madame Butterfly, David Henry Hwang's stunningly theatrical Tony Award-winning Best Play illuminates the stereotypes that underlie and threaten relations between East and West – and men and women.”
I’m thinking that my brief glance-over was a bit too brief. All I was really interested in was seeing Chris. The night before I left I was discussing the play with some theatre friends and one of them expounded a wee bit more on the play telling me that Chris’s character, Gallimard, falls in love with a Chinese…wait for it…man. Wait…what? Slightly taken aback and yet still eager to go, Lauren, A&J, and I arrived at the Suzanne Roberts Theatre, new home to the Philadelphia Theatre Company ready to…well ready to watch however trepidatiously.
By 10.30 that evening I was ready to declare Hwang a genius. M. Butterfly if a fascinating, moving experience. The oh-so-trite ‘makes you laugh and makes you cry’ may indeed be trite but are still accurate. To begin, the set was gorgeous. The designer Michael Fagin created a tunnel of red silk fans that set off the occasional shoji screen, lanterns, and beautiful kimonos. The acting was fantastic. All the main characters were so engaging and believable. Jared Michael Delaney in the role of Mark, Gillimard’s friend was charming. Telly Leung was the real surprise to us though. Leung, currently on a break from Broadway’s Rent and with a history of musical theatre including Wicked, Sweeney Todd, The King and I, and more, portrayed Song Liling, aka Butterfly, in such a fashion that I never questioned him as a woman. In addition to his acting, sang snippets from Puccini’s Madam Butterfly aria “Con onor muore” in a stunning falsetto that I haven’t heard…well…ever. I’m a dreadful vocal snob not afraid to rudely pull faces when I don’t think someone’s voice is up to snuff…but Lueng’s voice caused me to sit up and admire.
And the reason I went, Christopher Innvar…brilliant. My experiences with Chris have been limited to “fluff” theatre such as his performances in The Beaux Strategem and Taming of the Shrew at the Shakespeare Theatre Company here in DC to his melting vocals in 101 in the Shade. M. Butterfly showed his ability to delve more deeply in the human psyche and be serious. While we love him for his talent at playing the charming rake, we now admire him more for his versatility. Although one must wonder how Chris’s character Gallimard doesn’t know that Song is male…cause really?
So if you’re in or not far from Philly and want a sensational night at the theatre, get your ticket to M. Butterfly now. It’s not playing long and tickets are almost gone.
18 January 2008
Testing out my new mixer
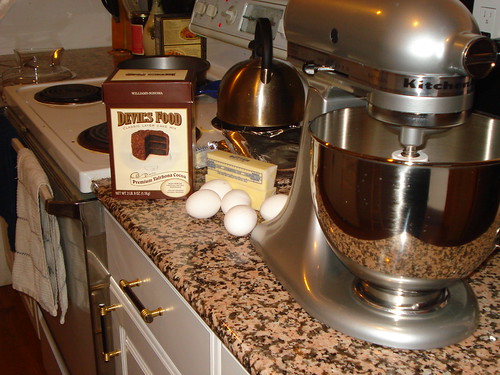 For Christmas, my mom sent me the SHINY, NEW! mixer pictured above. I've wanted a Kitchen Aid mixer for as long as I've been somewhere that has a kitchen, and this one is a vision of perfection in stainless steel. For my first attempt at using the mixer, I thought I'd try out something simple. A cake mix that I picked up at Williams Sonoma. Sure, I could make everything from scratch, but I don't see that this was all that far from being homemade.
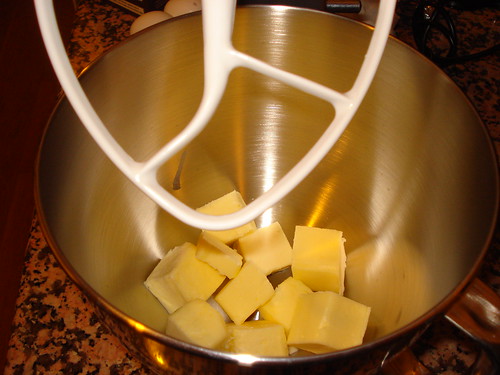
The cake started out with butter...lots of it. And what felt like 2 pounds of sugar and nearly half a dozen eggs. As I was putting it together, all I could think was, this cake had better be moist and awesome for all of this butter that's going in it. If you look closely (and can visually measure butter sticks) at the picture above, you'll see that it's 2 1/4 sticks in all.

I combined all of the butter, eggs, and sugar until it was totally smooth. The cool thing about this mixer is that I put the lid on, and just walked away as it did all of the work for me. I came back about 5 minutes later with completely smooth butter-sugar base to add the cocoa flour to round out the batter. The photo above is the fully combined cake batter.
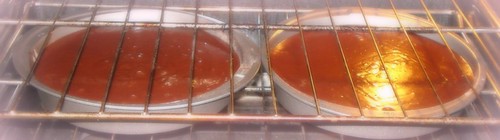 Now, when putting the batter into the prepared pan, I have a couple of tricks that seem to work very well for keeping the cake flat (to minimize the amount you have to cut off to keep it flat), and to ensure that it comes out smoothly. First, when making the batter, I hold off about 1/2oz of the dry batter. Then, I lightly grease the pan all around the bottom and sides. I use the dry batter to dust the greased pans, and sometimes will even brush it to make it even. Then, I pour in the batter, and put the cakes in the oven. Above, are the two layers of cake in the oven, before I removed the top shelf to give them room to rise. After the cakes come out of the oven, if you let them cool for about 30 minutes before you try to remove them from the pan, they will come out a lot easier.
 While waiting for the cakes to continue to cool after I'd removed them from their pans, I whipped up the frosting...literally. This was actually a very high quality pre-made dark chocolate frosting from Williams-Sonoma. I had a spoonful before I put it into the bowl, and OMG was it fantastic. Before I whisked it, is was almost black in color. After 1 minute of whisking air into it, it was a rich, cocoa color. I refrigerated the frosting, in the bowl for about 45 minutes.
Once the frosting is chilled, and the cakes are VERY cool, I started the process of priming the cake to be frosted. The first step is to brush off the crumbs of the cake with a pastry brush. Then, cut the risen part of the cake to create a nice, flat top just like the bottom. Do this to both layers. Then, take just a dab of frosting and put it on the center of the plate or cardboard round where you will be frosting your cake. Position the bottom of your first layer (bottom down) onto the frosted dab.
 Then, begin to lightly frost your cake. Once the bottom layer is frosted, don't forget to make sure that there is a generous amount of frosting on top of it so there is a nice layer of frosting between the two layers. Then, place the top layer, top down, onto the bottom layer. This will create a nice, flat top for your cake courtesy of the bottom of your cake pan. From there, continue to lightly frost the cake, and scrape off any excess. Then, refrigerate the cake, as is for at least 20 minutes. In the case of this cake, I refrigerated it for about 90 minutes, and it worked like a charm.
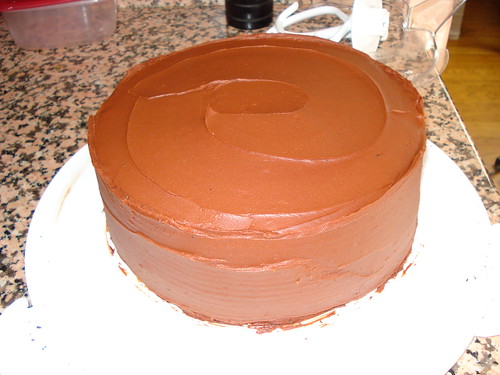
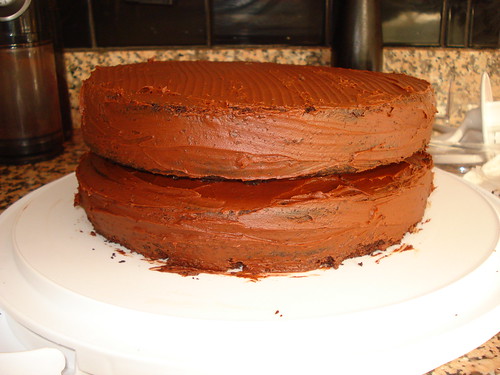
Once your cake is done chilling, then frost liberally all the way around, paying particular attention to the edge gaps between the two layers. In the picture above, you can see the strokes of my frosting knife as I turned it around the cake. With all the frosting that was left, I piled it on the top of the cake and smoothed it out in a circular fashion. Then, I played around with the strokes of the knife until the design I wanted appeared on the top.
Perfection!
15 January 2008
Chocolate Peanut Butter Mousse Pie
I have somehow become the official baker of all division birthday cakes and confections. I don't really mind because I like to bake and I'm learning how to decorate and use fondant etc. I had a busy summer with three birthdays landing right on top of each other so when the next birthday rolled around at the beginning of January I was ready to go again. At the birthday boy's request I made a Chocolate Peanut Butter Pie.

As much as I'd love to take credit for the recipe I sadly cannot. I just make 'em-I don't make 'em up. I got this recipe from Epicurious and must say-it was awesome.
BLACK-BOTTOM PEANUT BUTTER MOUSSE PIE
Nonstick vegetable oil spray
7 whole graham crackers, coarsely broken
1/4 cup (1/2 stick) unsalted butter, melted
4 tablespoons sugar, divided
1 1/3 cups bittersweet or semisweet chocolate chips (about
8 ounces)
2/3 cup plus 1 3/4 cups chilled whipping cream, divided
2 tablespoons light corn syrup
2 teaspoons vanilla extract, divided
6 ounces (1 cup) peanut butter chips
2 tablespoons creamy peanut butter (do not use old-fashioned style or freshly ground)
Preheat oven to 350°F. Spray 9-inch-diameter glass pie dish with nonstick spray. Blend graham crackers, melted butter, and 2 tablespoons sugar in processor until moist clumps form. Press crumb mixture over bottom and up sides of prepared pie dish. Bake crust until lightly browned, about 15 minutes.
Meanwhile, combine chocolate chips, 2/3 cup cream, corn syrup, and 1 teaspoon vanilla in microwave-safe bowl. Microwave on medium heat until chocolate softens, about 3 minutes. Whisk until melted and smooth. Spread chocolate mixture over bottom of crust. Freeze 10 minutes.
Microwave peanut butter chips and 3/4 cup cream in large microwave-safe bowl on medium heat at 15-second intervals just until chips soften, stirring often. Whisk in peanut butter and 1 teaspoon vanilla. Cool to barely lukewarm. Beat remaining 1 cup cream and 2 tablespoons sugar in medium bowl until very thick but not yet holding peaks; fold into peanut butter mixture in 3 additions. Spoon mousse over chocolate layer. Chill at least 1 hour and up to 1 day.
I cheated (bought a pre-made Oreo pie crust) and used a few substitutions (peanut butter instead of peanut butter chips) but it still turned out fantastically. After it was all set up I used whip cream from a can (make sure to use full fat or it will melt as mine sadly did) to make piles of cream on top of the pie and then I topped each one with a mini peanut butter cup.
Again-it was unbelievably good.

08 January 2008
Happy New Year!
Happy New Year everyone! On Sunday, Andrea and I celeberated Kings Day (the last day of the Christmas Season) together by exchanging small gifts and cooking Sunday Supper that afternoon. Our dinner consisted of Roasted Leg of Lamb with yogurt mint sauce, roasted vegetables, and green beans (a la Christine, as we refer to them). It turned out to be quite the colorful and delicious dinner even though the effort was pretty minimal.
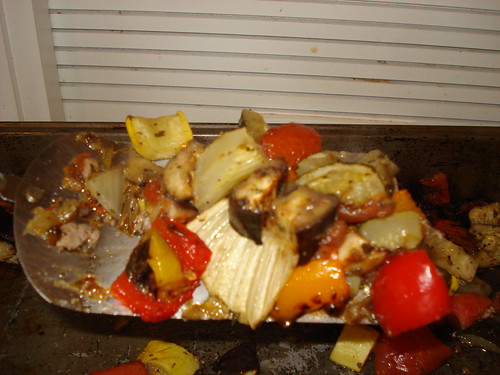
On Saturday, Andrea tasked me to find a "new" vegetable to add to our mix of usual roasted veg of Eggplant, zucchini, yellow squash, tomatoes and onion. Normally, we toss these together with herbs or pesto and roast them in the oven for a quick and nutritious side dish. Since this is the way that we eat our vegetables most of the time, I can confidently say that we were pretty desperate for something new. I went to Whole Foods and found Fennel. That's right, fennel. The label read that they tasted like sweet anise, and even though I knew that Andrea hates the taste of anise, I decided to run with it anyway. I figured that anise flavor would probably cook out, leaving a nice flavor on the rest of the vegetables. It turns out, I was right! Now, before you look at this picture, just remember, 'tasty food is not always beautiful, and beautiful food is not always tasty.'
Roasted Vegetables:
1/2 yellow squash
1/2 zucchini
1/2 medium eggplant
1/2 fennel, chopped coarsely
1/2 yellow pepper
1/2 orange pepper
2 or 3 roma tomatoes
toss with basil, oregano, and thyme. Toss in single layer in a pan and bake for 30-45 minutes in pre-heated oven (375 degrees), or until soft.
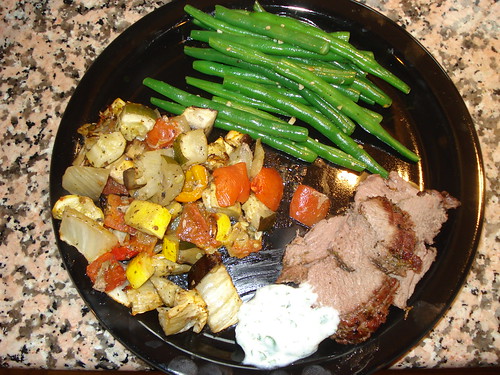
With our lamb leg from Trader Joe's already pre-marinated, we didn't feel the need to do anything additional to it, and just "let the flavors work." We placed the lamb right on the rack in the oven with our pan of roasted veg directly underneath to catch all the luscious lamb drippings.
This meal was so great, that we have decided to have Sunday Supper together every week!
Green Beans a la Christine coming soon!
On Saturday, Andrea tasked me to find a "new" vegetable to add to our mix of usual roasted veg of Eggplant, zucchini, yellow squash, tomatoes and onion. Normally, we toss these together with herbs or pesto and roast them in the oven for a quick and nutritious side dish. Since this is the way that we eat our vegetables most of the time, I can confidently say that we were pretty desperate for something new. I went to Whole Foods and found Fennel. That's right, fennel. The label read that they tasted like sweet anise, and even though I knew that Andrea hates the taste of anise, I decided to run with it anyway. I figured that anise flavor would probably cook out, leaving a nice flavor on the rest of the vegetables. It turns out, I was right! Now, before you look at this picture, just remember, 'tasty food is not always beautiful, and beautiful food is not always tasty.'
Roasted Vegetables:
1/2 yellow squash
1/2 zucchini
1/2 medium eggplant
1/2 fennel, chopped coarsely
1/2 yellow pepper
1/2 orange pepper
2 or 3 roma tomatoes
toss with basil, oregano, and thyme. Toss in single layer in a pan and bake for 30-45 minutes in pre-heated oven (375 degrees), or until soft.
With our lamb leg from Trader Joe's already pre-marinated, we didn't feel the need to do anything additional to it, and just "let the flavors work." We placed the lamb right on the rack in the oven with our pan of roasted veg directly underneath to catch all the luscious lamb drippings.
This meal was so great, that we have decided to have Sunday Supper together every week!
Green Beans a la Christine coming soon!
Subscribe to:
Posts (Atom)